WooCommerce Connector
Overview
The WooCommerce Connector is a data integration feature within Clever AI that links your WooCommerce store to the Hello Clever platform. Once connected, Clever AI can read your store's data and provide intelligent insights, analytics, and answers to your business questions through the AI-powered chatbot.
This guide walks you through the end-to-end setup process: creating the REST API credentials in WooCommerce, entering them in Clever AI, and using the chatbot once your data has synced.
If your transactions already flow through the Hello Clever payment gateway, you can use Clever AI immediately without connecting WooCommerce.
The WooCommerce Connector is an additional feature used when you want Clever AI to enrich its response with store-specific data (orders, customers, products) beyond payment transaction insights.
Prerequisites
Before you begin, make sure you have the following:
- An active WooCommerce store with admin access
- A Hello Clever merchant account with access to Clever AI
- Permissions to create REST API keys in your WooCommerce store's settings
Ready to proceed with the setup process? Proceed to the step-by-step guide.
How it works
The WooCommerce Connector uses WooCommerce's secure REST API to grant Clever AI read-only access to your store's data. Here is the flow:
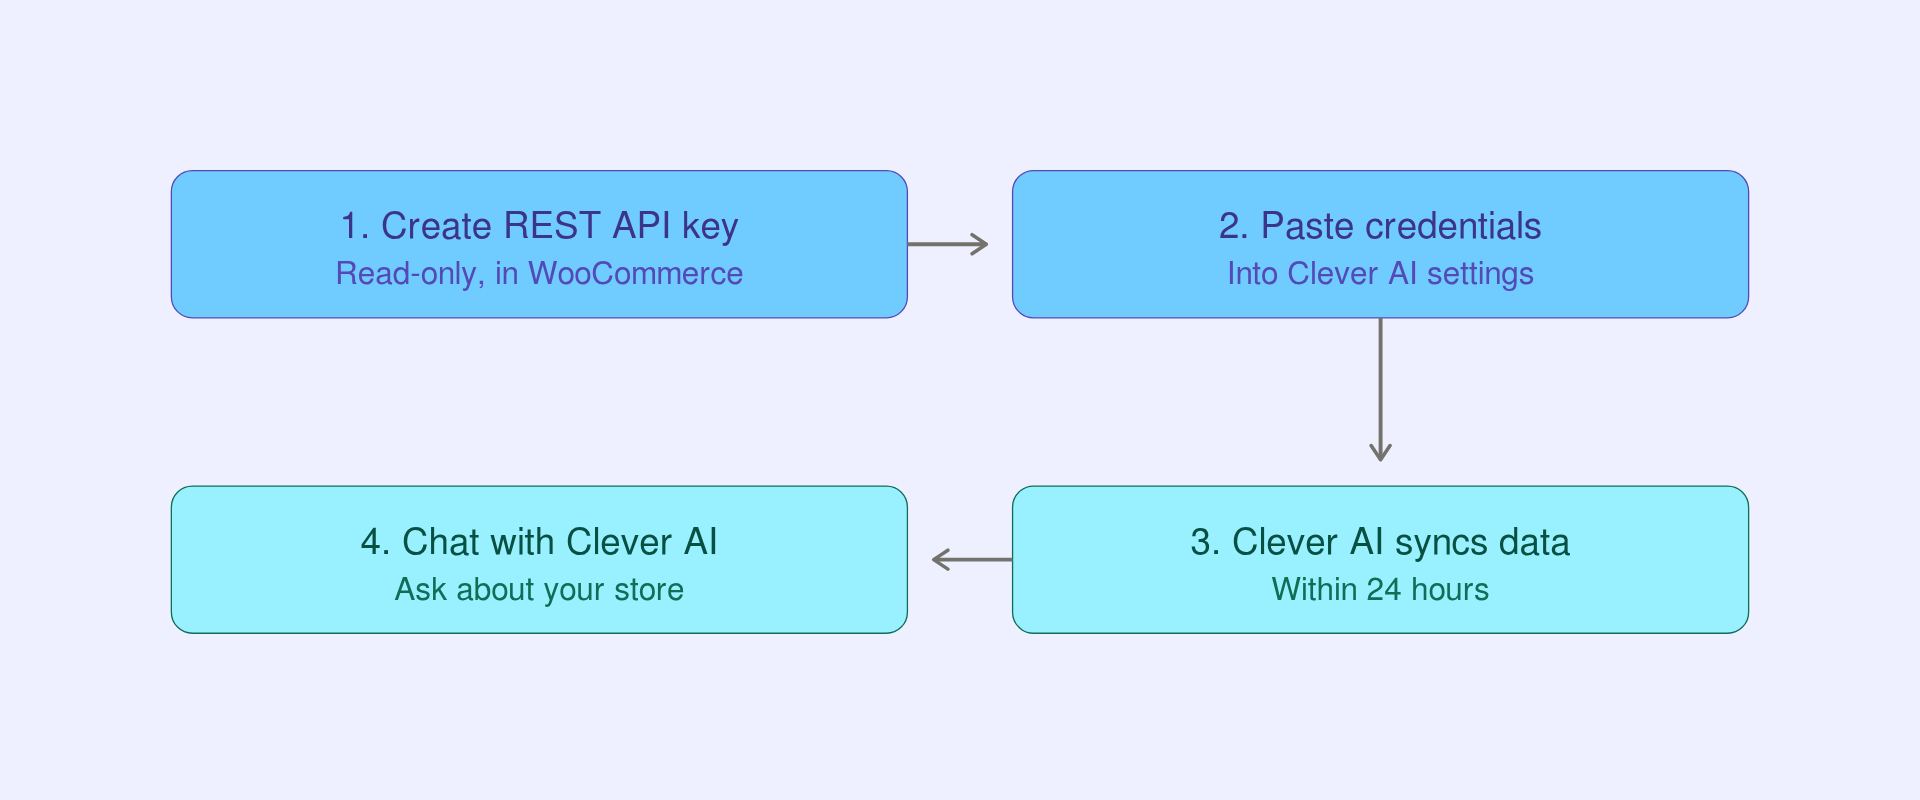
- You create a read-only REST API key in your WooCommerce store settings.
- You copy the Consumer key and Consumer secret from WooCommerce and paste them into Clever AI connector settings.
- Clever AI syncs your store data within 24 hours.
- Once synced, you can chat with Clever AI about your store's performance, customers, and orders.
Clever AI only reads your WooCommerce data. It does not write to, or delete anything in your store. When you create the REST API key, you set its permission to Read so access is strictly limited to viewing data.
Data scopes
Unlike Shopify, WooCommerce does not ask you to select individual data scopes. A single read-only REST API key grants access to your store data, and Clever AI reads it through nine defined categories on the Hello Clever side. The following table describes each category.
| Category | What Clever AI can access |
|---|---|
| Customers | Customer profiles, contact details, and purchase history |
| Orders | Order details, line items, totals, and fulfilment status |
| Products | Product listings, variants, pricing, and inventory levels |
| Coupons | Discount and promotional pricing configurations |
| Refunds | Refund requests and their current statuses |
| Payments | Payment records associated with orders |
| Payouts | Payout records and settlement details |
| Disputes | Chargeback and payment dispute records |
| Reports | Aggregated sales and performance summaries |
- Clever AI answers questions about your store based only on the data available through these categories.
- These categories are defined within the Hello Clever system, not selected by you during WooCommerce setup. You cannot add or remove them from the WooCommerce side.
- Sensitive data such as bank account details, passwords, and billing information are never requested and are never accessible.
Step-by-step guide
Using the WooCommerce Connector requires three (3) parts:
- Create a read-only REST API key in WooCommerce.
- Add the credentials in Clever AI.
- Start using Clever AI to query your store data.
Each part is discussed in detail below.
Part 1 - Create a read-only REST API key in WooCommerce.
- Open your WooCommerce store's admin dashboard. To do this, add
/wp-adminto the end of your store URL, for examplehttps://mystore.com/wp-admin.
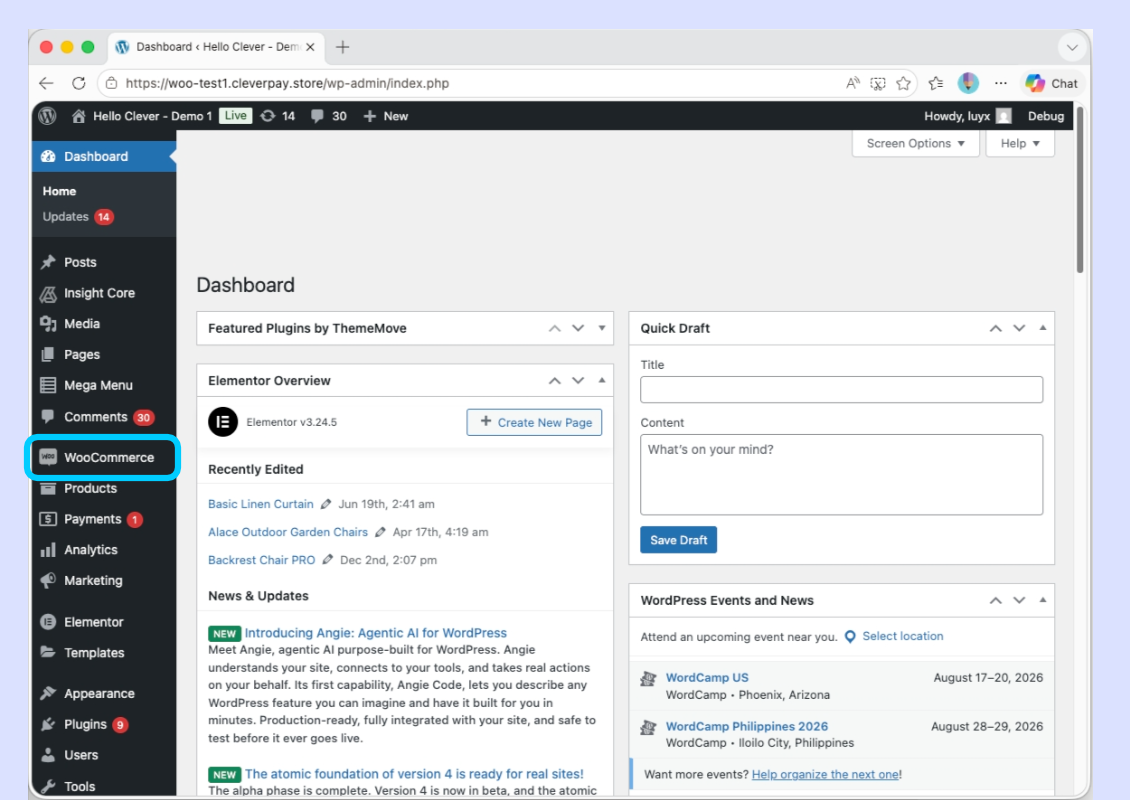
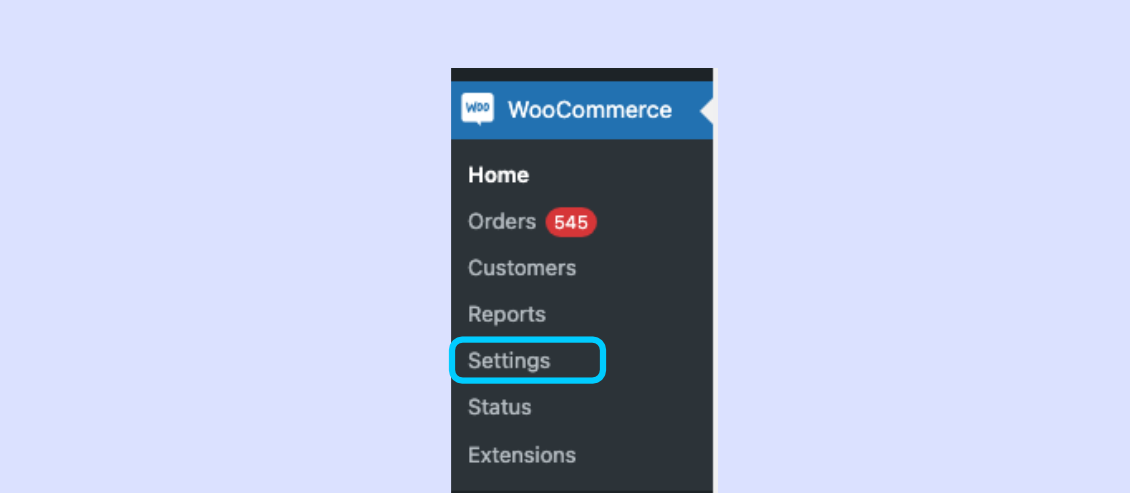
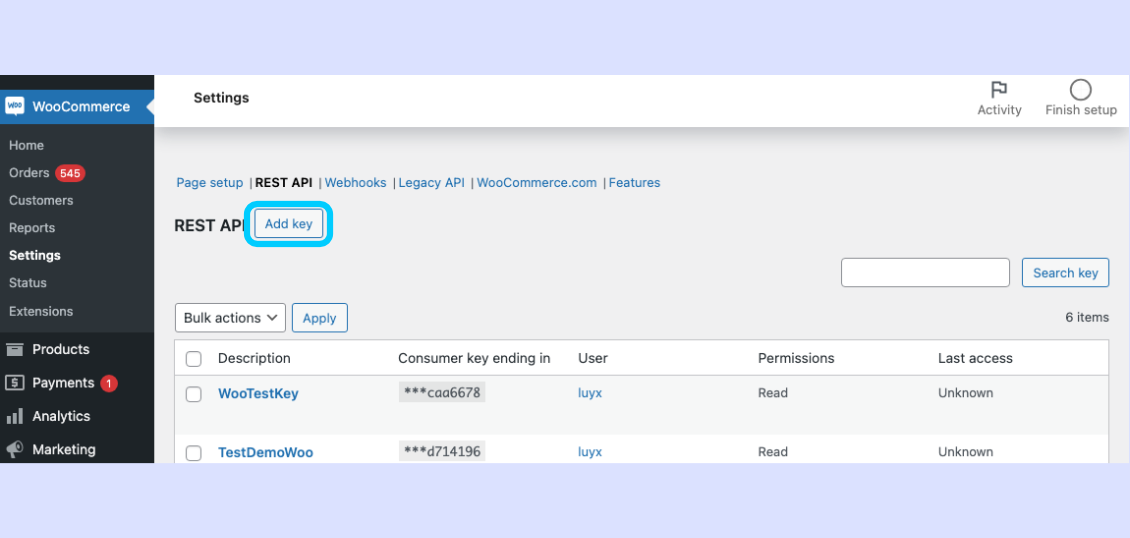
- In the left-hand navigation, select WooCommerce, then select Settings.
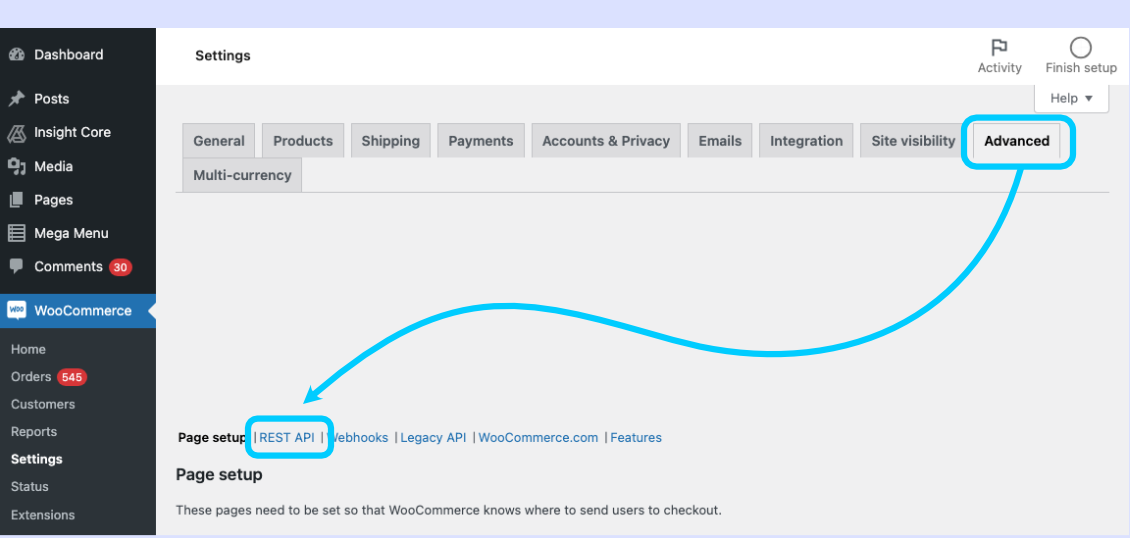
- Select the Advanced tab, then select REST API.
- Select Add key. This opens the Key details form.
- Complete the Key details form:
| Field | What to enter |
|---|---|
| Description | A label to identify this key, e.g. "Clever AI Connector". |
| User | Select the admin user the key belongs to. |
| Permissions | Select Read. Do not select Write or Read/Write. |
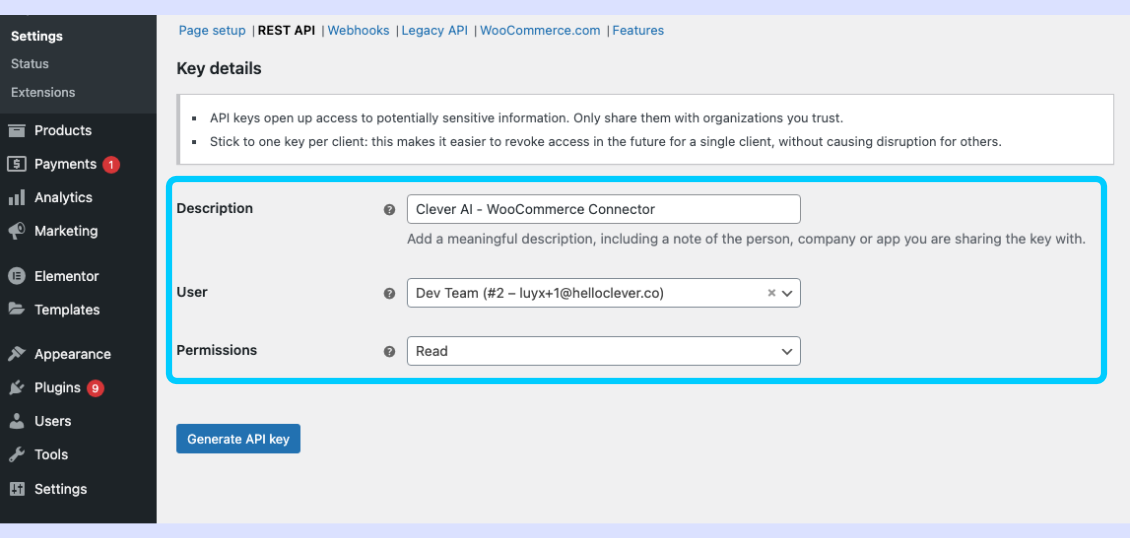
WooCommerce sets access through the Permissions field on the key itself. You do not select individual scopes as you would in Shopify. Choose Read so Clever AI can view your data without making any changes.
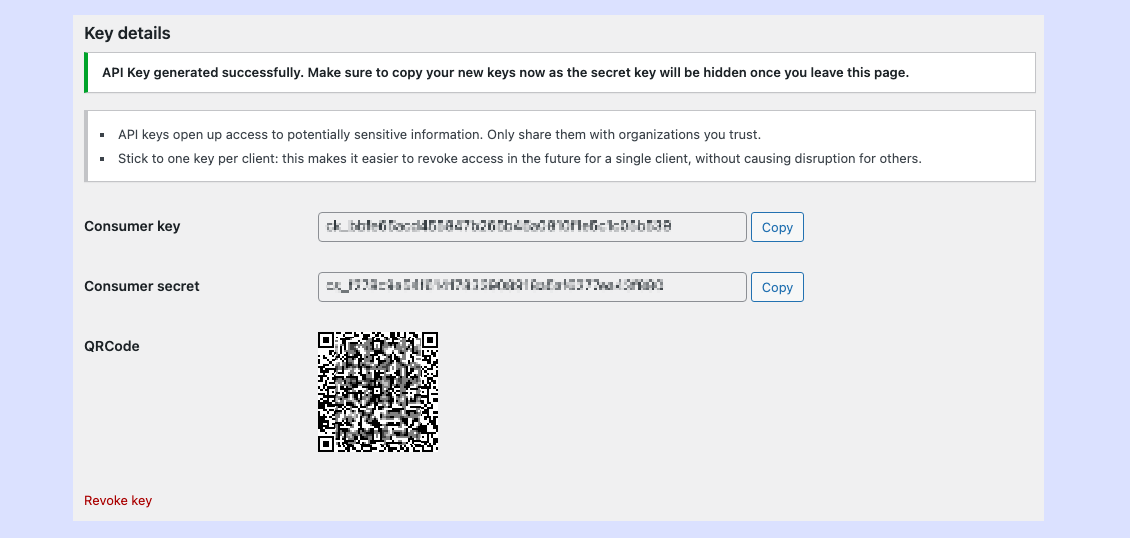
- Copy and save the Consumer key and Consumer secret for use in Part 2.
WooCommerce displays the Consumer key and Consumer secret only once. Copy and save them before you leave this page. If you lose them, you must generate a new key.
Part 2 - Add the credentials in Clever AI.
- Log in to your Hello Clever merchant account and navigate to the Clever AI hub.
- In the prompt box, select + Data connectors. From the pop-up options, select WooCommerce under Add new data connector.
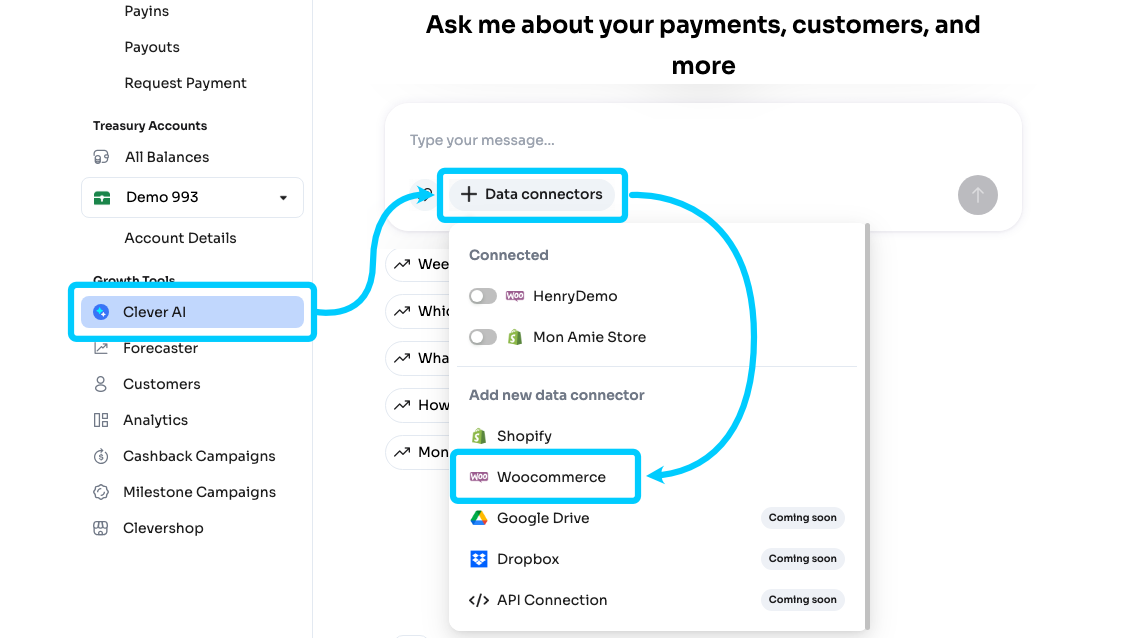
- In the setup form, enter the following details:
| Field | What to enter |
|---|---|
| Store name | A friendly label to identify this connection, e.g. "My WooCommerce Store". |
| Store URL | Your full WooCommerce store URL, e.g. https://mystore.com. This is unique to your store and must match exactly. |
| Consumer key | The Consumer key you saved in Part 1, Step 7. |
| Consumer secret | The Consumer secret you saved in Part 1, Step 7. |
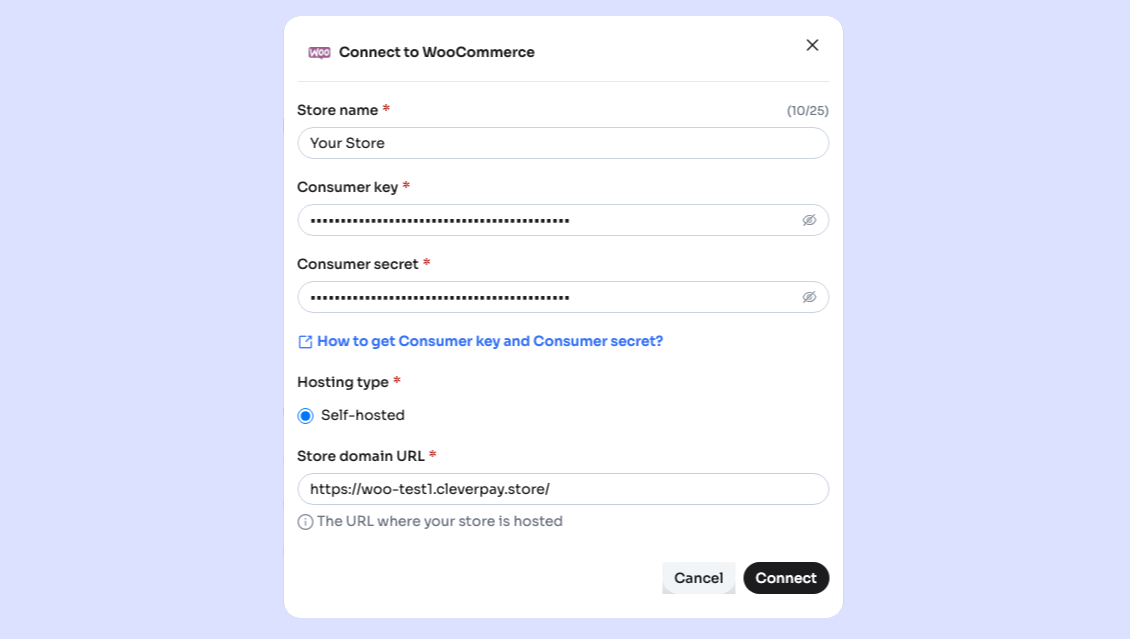
- Select Connect. The connector is now connected to Clever AI.
Clever AI will begin syncing your store data. This process can take up to 24 hours.
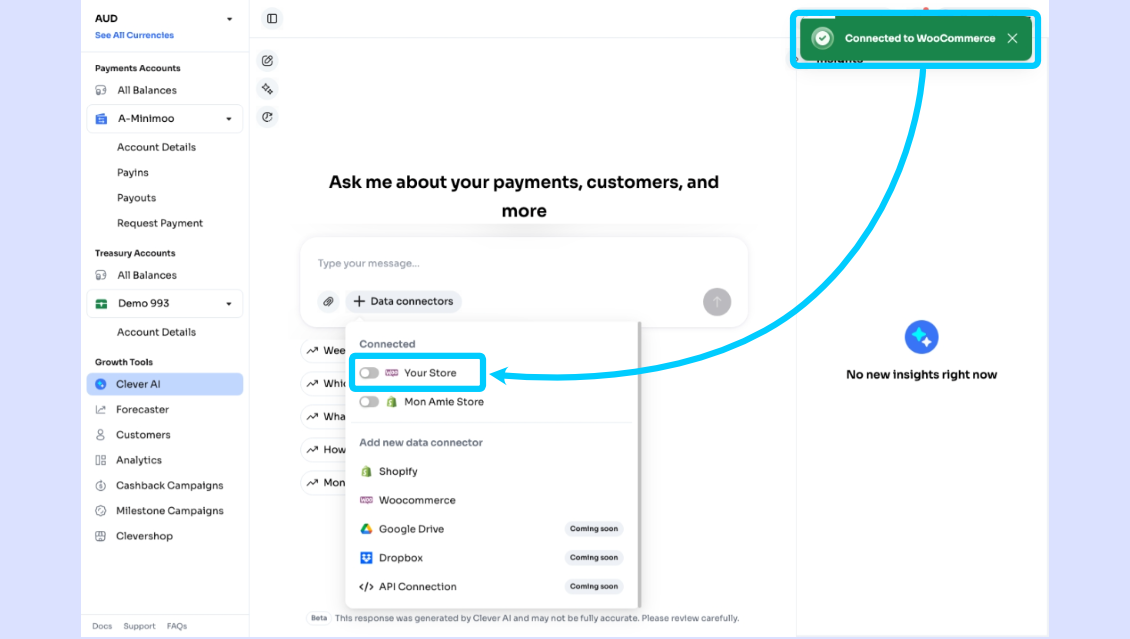
Part 3 - Start using Clever AI to query your store data.
Once your WooCommerce store has been connected to Clever AI, you can ask questions specific to your store information.
- In the prompt box, select + Data connectors.
- From the pop-up menu, toggle on your store's name.
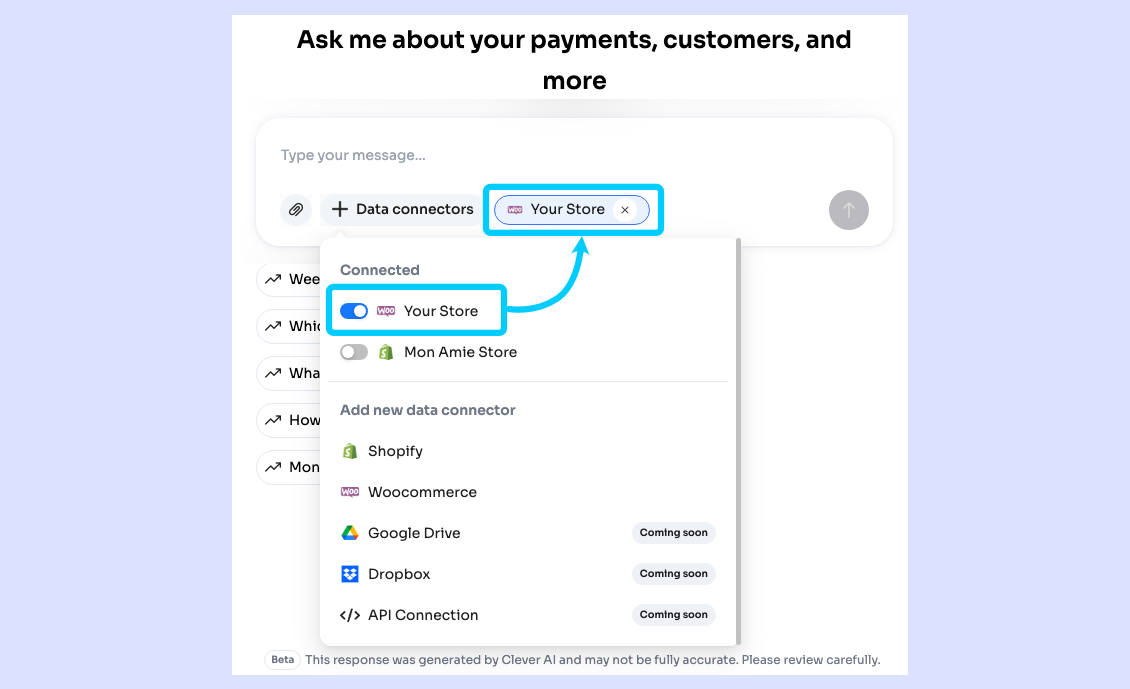
- Start asking questions. Clever AI will now query your store's data when answering.
Glossary
| Term | Definition |
|---|---|
| Consumer key | A secure credential generated by WooCommerce that allows Clever AI to authenticate with your store's REST API on your behalf. |
| Consumer secret | A secondary credential paired with the Consumer key, used for secure API communication. |
| Clever AI | Hello Clever's AI-powered chatbot that analyses your store data and responds to business queries. |
| Data connector | An integration that links an external platform (such as WooCommerce) to Clever AI as a data source. |
| Hello Clever Hub | The central dashboard where merchants manage their Hello Clever products, including Clever AI and data connectors. |
| Read-only access | Access that allows Clever AI to view and analyse data without making any changes to your store. |
| REST API | The WooCommerce interface that lets Clever AI read your store data securely. |
| REST API key | The credential pair (Consumer key and Consumer secret) you generate in WooCommerce to grant access. |
| Store URL | The unique web address of your WooCommerce store, e.g. https://mystore.com. |
| Store name | A user-defined label for your connection in Clever AI. This is different from your Store URL. |
| Sync | The process by which Clever AI retrieves and indexes your store data so it can be queried by the chatbot. |
Troubleshooting
Duplicate Store Domain Error
Each store domain is treated as a unique identifier in the Clever AI system. If you see an error about a duplicate store domain, it means that store has already been registered.
To resolve this:
- Check whether the connector has already been set up by another team member.
- If you need to re-connect, remove the existing connector entry before adding a new one.
- Make sure you are entering the Store URL and not the Store Name — these are different fields.
Store URL vs. Store Name
| Store URL | Connection Name (Store Name) |
|---|---|
The actual URL of your WooCommerce store, e.g. https://mystore.com. This must be unique and match your store exactly. | A friendly label you choose for your own reference within Clever AI, e.g. "AU Store" or "Main WooCommerce". Does not need to match your Store URL. |
Chatbot Cannot Answer My Question
If Clever AI responds that it does not have enough information, the most likely cause is the data category you are asking about.
- Clever AI answers questions only within the nine data categories listed in the Data scopes table above.
- If your question falls outside these categories, the chatbot cannot answer it.
- Confirm that your REST API key permission is set to Read so all available data can synced.
Data Has Not Synced After 24 Hours
If your store data still has not appeared in Clever AI after 24 hours:
- Verify that all credentials were entered correctly (no extra spaces or missing characters).
- Confirm the REST API key permission is set to Read and the key is still active in WooCommerce.
- Check that your Store URL was entered exactly as it appears.
- Contact Hello Clever support for assistance.
Security & Data Privacy
Hello Clever takes data security seriously. The following principles govern how Clever AI handles your WooCommerce data.
- Clever AI only requests read access. It will never write to, modify, or delete data in your WooCommerce store.
- Access is limited to the data categories Clever AI supports. No additional data is retrieved beyond these.
- Your API credentials are stored securely within the Hello Clever platform and are not shared with third parties.
- Sensitive financial information such as bank account numbers, passwords, and personal identity data fall outside the supported categories and are never accessible.
For questions about the data-sharing agreement between your store and Hello Clever, please refer to your merchant contract or contact the Hello Clever business team.
Need Help?
If you encounter an issue not covered in this guide, please reach out to the Hello Clever support team.
- Contact Hello Clever support through your merchant dashboard.
- Have your Store URL and Connection Name ready when contacting support.
- For urgent issues, include details of any error messages you received.